Saturday, November 28, 2009

Pumpkin Cream Pies

I saw a recipe for pumpkin cream pie and I was astonished! It sounded so unbelievably perfect since I love, love, love cream pies. And guess what I did? Instead of making the custard, with all of its intense technique, listed in the recipe, I went back to my trusty faux-custard recipe that I've used for everything, including Boston cream pies, banana cream pies, fruit tarts AND cream puffs.
I added some pureed pumpkin and some spices and tada! Delicious pumpkin cream. Topped off with some whipped cream and pepita brittle??? Yeah... you know that's gonna be good! I especially loved the pepita brittle because it added the needed change of texture: delicious crunchiness, and some salty goodness.
The pepita brittle was incredibly easy to make, so don't be afraid to attempt it. I think its almost too easy to mess up. Hope everyone had a great Thanksgiving!

Pumpkin Cream Pie

Yields: about 10 mini pies

Pie recipe slightly modified from this recipe. Original pepita brittle recipe can be found here.


1 9-inch prepared graham cracker crust

(I used 10 mini graham cracker crusts)


For the custard:

1 large box french vanilla pudding

1 1/4 cups whole milk

3/4 cup heavy cream

1 tsp. vanilla extract

1 tsp. pumpkin pie spice

1 15 oz. can pure pumpkin puree


For the pepita brittle:

butter or vegetable oil

2 cups sugar

4 oz. unsalted butter

1/3 cup light corn syrup

1/2 cup + 2 tbsn. water

1/2 tsp. baking soda

1 tbsn. sea salt

1 1/2 cups pepitas, raw and untoasted


To make the custard, mix together the pudding mix, milk, and heavy cream and beat until nice and thick, about 5 - 10 minutes. Stir in the vanilla, spices and puree. Mix well then pour and spread into the prepared pie crust. Set in refrigerator. Top with whipped cream if desired, then with the brittle


For the britte, line a large baking sheet with parchment paper or silpat. If using parchment, grease the paper with butter or oil. In a medium or large saucepan, combine the sugar, butter, corn syrup and water. Stir the sugar until it is completely moistened. Cook sugar over medium heat until it thickens. It bubbles quickly and often so keep an eye on it and reduce heat as necessary to keep it from bubbling over. The sugar mixture should turn golden after ten minutes. When it is just shy of the desired color, remove from heat and whisk in the baking soda and salt carefully. Using a heatproof spoon, fold in the pepitas and pour onto the baking sheet and quickly spread out evenly. Break it into pieces when completely cool, store in airtight container.

P.S. I will no longer be posting hostile, ill-mannered comments. Though I do believe that everyone has a right to express their opinions, I think that once racial slurs start to appear, a line has been crossed. A big thank you to everyone that reads this blog, who has supported it and I do hope you enjoy my posts :)

Wednesday, November 25, 2009

Pioneer Woman's Cinnamon Rolls

Believe every word when I say, you absolutely have to make these at some point in your life.
Pioneer Woman. I swear, that woman is a goddess to me. Never have I ever had so many successful recipes from one site. Successful is even a bit of an understatement. What I meant to say was wondrous, spectacular, and bewitching. Wow these babies are good... mmmm.
My sister actually made these while I documented. This recipe makes oodles, so I think it's the perfect gift. Just pre-bake them, drizzle them in heavenly glaze then give them away and instruct your receivers to just pop in the oven for about 5 minutes to warm them up. My sister even made them in these little to-go foil pans that came with plastic tops and everything! So precious!
OMGGGGG please, please make these. I ate two right as they came out of the oven, and I surely could have scarfed down the whole plate... shame on me!
Pioneer Woman's Fabulous Cinnamon Rolls
Yields: about 8 pans worth (8 rolls per pan)
Original recipe can be found here.


For the rolls:
1 quart whole milk
1 cup vegetable oil
1 cup sugar
2 packages dry active yeast
8 cups, plus 1 cup extra (separated) flour
1 heaping tsp. baking powder
1 scant tsp. baking soda
1 heaping tbsn. salt
3 - 4 cups melted butter
2 cups sugar
generous sprinkling of cinnamon

For the frosting:
1 bag powdered sugar
2 tsp. maple flavoring
1/2 cup milk
1/4 cup melted butter
1/4 cup brewed coffee
1/8 tsp. salt

Mix the milk, vegetable oil and sugar in a pan. "Scald" the mixture (heat just before boiling point). Turn off heat and leave to cool for 45 minutes to 1 hour. When mixture is lukewarm to warm, but NOT hot, sprinkle in both packages of yeast. Let sit for a minute, then add 8 cups of flour, stir mixture together, cover and let rise for at least an hour.

After rising, add 1 more cup of flour, the baking powder, baking soda and salt. Stir mixture together. At this point you could cover the dough and refrigerate until you need it, overnight or even a day or two, if necessary. Just keep your eye one it and if it starts to overflow out of the pan, just punch it down. When ready to prepare the rolls, sprinkle rolling surface generously with flour. Take half the dough and form into a rectangle. Roll the dough thin, maintaining a general rectangular shape. Drizzle 1 1/2 to 2 cups of melted butter over the dough. Now sprinkle 1 cup sugar over the butter followed by a generous sprinkling of cinnamon.

Now starting at the opposite end, begin rolling the dough in a neat line toward you. Keep the roll relatively tight as you go, next pinch the seam of the roll to seal it. Spread 1 tbsn. melted butter in a seven inch round foil cake or pie pan. Then begin cutting the rolls about 3/4 to 1 inch thick and laying them in the buttered pans. Repeat with the other half of the dough, let rolls rise for 20 - 30 minutes, then bake at 375 F until light golden brown, about 15 - 18 minutes.

For the frosting, mix together all ingredients listed and stir well until smooth. It should be thick but pourable. Taste and adjust as needed. Generously drizzle over the warm rolls, don't skimp on the frosting!
Mmmmmm maple glaze...
I'm going in people!

Disneyland {Anaheim, CA}

Most people wouldn't know it, but Disneyland is a great place for food.
Yes, it can be overpriced but every once in a while, it's nice to spurge. Plus, Disneyland knows, if you're paying that much for something, it better be worth it. What's nice is that most of the things offered are delicious!

Above, the turkey leg is probably the most 'bang for your buck.' It's a gigantic leg of salty, tender meat. What could be better? Although, it does get a little iffy looking as you get to the bone and there are bunches of tendons and stuff...
Ice cream is a sure bet on a hot day. This mint chocolate sundae sure did hit the spot! But the best thing on a summer day has to be all the things offered at the Dole Tiki Bar!
You can either get a dole sundae (pictured above) or a dole whip (pictured below). The dole sundae combines the dole whip with fresh dole pineapple juice. It's tangy and creamy and perfectly tart. I prefer the dole whip on it's own - look how pretty it is!
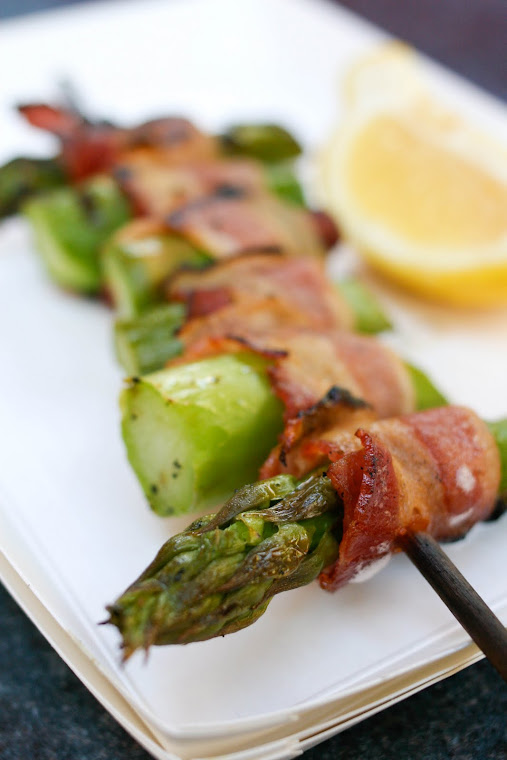
At Bengal Barbecue, they have varieties of meat skewers, grilled veggies and more. I loved this one below, which I forget the name of now, but it was spicy and so tender! And asparagus wrapped in bacon... now how could that ever go wrong?
One of my favorite all time treats from Disneyland now though has to be the jalapeno-cheddar soft pretzels! I loooove jalapenos and I love cheese. Combine that with soft pretzels and you've got an unbelievable winner. Plus, it's portable so you can take it along while you're meandering through the park, score!
I just HAD to get this caramel apple because it's so darned cute. At the end of the day though, it was just a caramel apple. Delicious but something you could get anywhere. Also, it was weird but they wouldn't cut it for us, so it was so hard to cut by ourselves.
Make sure to enjoy the fireworks too! Preferably with a churro in your hand ;D

Tuesday, November 24, 2009

Tailored Tuesdays

1. Marc by Marc Jacobs "Classic Q hillier hobo"
2. 3.1 by Phillip Lim "Sequined silk chiffon taste"
3. Current/ Elliott "The skinny distressed jeans"
4. Giuseppe Zanotti "Camouflage flat sandals"


all images can be found atnet-a-porter.com

Sunday, November 22, 2009

Zucchini & Eggplant PIzza

My sister brought home a plethora of zucchini home the other day. We've been trying to use it up because one, they are beautiful zucchini that should not go to waste and two, because zucchini is awesome and unbelievably delicious and not to mention versatile. So far we've made whole wheat zucchini muffins, zucchini frittatas and now this: zucchini and eggplant pizza!

I think so far this has been my favorite of the recipes we've tried. Actually, my sister made this genius pizza. Super thin crust, just how I like it and bursting full of flavor. Such a great combination with the eggplant and uber melty mozzarella. Try this immediately, I love it.
Zucchini & Eggplant Pizza
Yields: 1 large pizza, about 10 slices


1 (16 oz.) package of pizza dough (I use Trader Joes' whole wheat version)
1/2 - 1 cup shredded mozzarella cheese
1/4 - 1/2 cup pizza sauce/ marinara sauce
1 zucchini, thinly sliced
1/2 purple eggplant, thinly sliced
10 - 15 basil leaves
1 large clove garlic, minced
1 tsp. dried oregano

Preheat oven to 350 F. Line a large baking sheet with foil and lightly grease with non-stick spray or some olive oil. Take your pizza dough and press out onto the baking sheet till about 1/2 inch thick. Using your hands spread the minced garlic all over the top of the dough, then spread the pizza/ marinara sauce all over the dough, leaving a 1 cm thick border around the edges. Sprinkle with the cheese and oregano. Spread the basil leaves, zucchini and eggplant evenly over the surface of the pizza and cook in the oven until cheese is melty and crust is golden brown, about 10 - 15 minutes.

Thursday, November 19, 2009

Vietnamese Crab & Asparagus Soup/ Súp Măng Cua

When I went to Vietnam last summer we spent most of our time in Saigon, also known as Ho Chi Minh City. Everyday was for the most part, an adventure. Either it was meeting new people, exploring new places or most importantly, eating more food. I have never experienced Vietnamese food as good as it was in Vietnam, which obviously makes sense.
Near our hotel was an outdoor market that my family and I would visit almost every single morning. Our popular choices for our meals were either noodle soup or Chè, which is a type of Vietnamese dessert. The woman who sold the Chè also sold the most amazing súp măng cua I have ever tried in my life! Fresh, always steaming hot and filled with deliciously large chunks of crab. This soup has always been one of my favorites and surprisingly its super easy to make too. This recipe is from my mother and is equally as delicious too. Warms me up perfectly on these cold winter days!
This recipe is kind of a mix between the traditional Crab/Asparagus soup and Shark Fin soup. I couldn't find anything else like it online, so I think it might just be something my mom made up herself. My mom's súp măng cua doesn't have any eggs in it, as you see in some other recipes and she adds enoki mushrooms, which is by far my most favorite part of the soup! Also, we use imitation shark fin because we happen to think cutting off the fins of sharks is definitely not right. But in the pictures you can see some clear-ish noodle looking things, which is actually the imitation shark fin. It adds a really nice texture to the soup. I tried looking up imitation shark fin online so I could show you guys what I'm talking about, but no luck! It can definitely be found in Vietnamese grocery stores and I'll update you if I find out more information. If it can't be found, this soup is equally delicious without it.

Vietnamese Crab & Asparagus Soup/ Súp Măng Cua
Yields: about 8 servings


10 cups homemade chicken stock, low-sodium canned also works
1 large can white asparagus, drained
2 cans of enoki mushroom, drained
imitation shark fin
1/2 lb. crab meat
1 - 2 tbsn. cornstarch, dissolved in 1/2 cup water
fish sauce, to taste
pepper, to taste
cilantro, chopped (for garnish/ optional)

Heat your chicken stock over medium-high heat. Add the asparagus, mushrooms, imitation shark fin and crab meat. Next, add the corn starch mixture, stir until incorporated and bring to a boil. Stir until thickened, about 1 minute. Turn heat to low and add fish sauce and pepper to taste, top with some cilantro and enjoy!

Wednesday, November 18, 2009

Toasted Coconut Cupcakes

My sister baked some cupcakes for her little kids the other day with some to spare. No she doesn't have actual children yet! I am referring to the children she teaches. Anyways I had some extra cream cheese frosting from some Red Velvet cake I baked and topped her extra cupcakes with them. Oh and added some toasty coconut as well! They were yummy so I'd thought I'd post them here. They had just a slight note of coconut but it paired nicely with the tangy cream cheese and moist chocolate cake!

Toasted Coconut Cupcakes
Yields: 24 cupcakes
Cake recipe from here, frosting recipe from here.

1 bag of coconut, toasted lightly

Cream Cheese Frosting


16 oz. cream cheese (2 sticks), room temperature

1/2 cup unsalted butter (1 stick), room temperature

1 tsp. vanilla extract

2 1/2 cups powdered sugar, sifted

pinch of salt


With an electric mixture, blend together the cream cheese and butter until smooth. Turn mixer to low speed and blend in the powdered sugar, salt and vanilla. Turn mixer on high until light and fluffy. Use immediately or refrigerate, covered, until ready to use. If refrigerated, before use bring back to room temperature.


Tuesday, November 17, 2009

Tailored Tuesdays

I'm totally obsessed with brogues! I need to find some immediately, preferably reasonably priced please.

1. Vince "Cashmere blend oversize sweater"
2. Acne "Kex le blue skinny jeans"
3. Lanvin "Happy sac partage shoulder bag"
4. Church's "Leather and plaid brogues"
5. Lee Angel "Serena glass peal necklace"

all images can be found at net-a-porter.com

Sunday, November 15, 2009

Vietnamese Coffee Jellies

So I've recently become interested with homemade jello, odd right? I can't explain my ways, odd things just happen to cross my mind, then continue to intrigue me for a good week or sometimes much longer. Well, first I made some tea jellies, and let me tell you, they were awesome. Super refreshing and if you love tea, its a great way to enjoy it. Since I was so wildly successful, I decided to try again but this time with Vietnamese coffee.
Yummmm. I really don't think you can do wrong with jello. Once you've got your standard recipe, the possibilities are endless! I can't wait to try so many things! It's super easy and a great snack. This coffee jello is great alone, but I could see it being delicious chopped up and added to drinks or whatever your mind desires it with.
Add condensed milk to your liking till it turns a nice caramel color:
This little guy was meow-ing so sadly, so I gave him some milk and he was happy:
Mmmmm jiggly coffee:
Vietnamese Coffee Jellies
Yields: about 2 - 4 servings
Inspiration here.

Printable Recipe

3 -4 tbsn. Vietnamese coffee, such as Cafe du Monde
2 cups water, boiling
Sweetened condensed milk, to your taste
2 envelopes of gelatin/ 4 sheets of gelatin

To brew the coffee, remove the metal filter and add 1 heaping tbsn. of coffee grinds into the coffee maker. Twist the top of the filter back on until it stops. Make sure the filter is not too tight or else nothing will drop through and if its too loose, the drip will be too watery. Place it over an empty cup then pour the boiling water on the top of the filter until filled and allow the water to filter through. Brewing time should take 3 - 5 minutes. Continue this process until you have about 2 cups of coffee, using more coffee grinds as necessary. Add the condensed milk to your preferred taste, then add the powdered gelatin and stir until it is completely dissolved (If your coffee is no longer hot, make sure to heat it up again before adding the gelatin, it will dissolve easier this way). Pour into your preferred container and refrigerate until solid, about 2 - 4 hours. Enjoy!


Top with some more condensed milk and you're good to go!

Saturday, November 14, 2009

Fifi Lapin

From the website: "Fifi Lapin is an extremely stylish rabbit. Fifi was born one out of 257 brothers (you know what they say about rabbits) but sadly there was an outbreak of myxamatosis when she was just a year old and she was the only one to survive. Her parents are therefore incredibly protective and spoil her rotten... she loves nothing better than spending her time shopping, browsing fashion magazines and attending the opening of a red envelope." I wish that was my life...
"A few of my favorite things"
"Luella love"
"But then it rained so I went home"
"The rose dress"
"Colour blocking"
"The red shoes"

I Basically love Fifi. She was my background for a while, but I am fickle and my background often changes as my love waxes and wanes along with the moon. Isn't she just adorable?

Purchase Fifi prints here.
Learn about Fifi's latest outfit here.

Thursday, November 12, 2009

Seared Ahi Tuna Rolls

So, I've been consumed in this ongoing battle. I am a woman obsessed. I can't get enough of it. What is it? Seared tuna. I absolutely love it. Never heard of Ahi Tuna spring rolls? Neither have I until I started working at a Vietnamese restaurant called Phans 55. Once I tasted it, I was completely in love and on a mission to recreate it.
And to my surprise, its quite easy! I love spring rolls in general because they're simple, healthy and easy to transport. This spring roll is super, super yummy. It has tons of textures and when dipped into the two sauces, is absolutely delicious! All you really have to do is sear the tuna, which literally only takes 1 - 3 minutes tops. Mix a couple of things together and you're all set. I beg you to try it immediately, you won't be dissapointed!
Beautiful, velvet-y tuna, oh how I love you so.
Still pink and yummy on the inside, with a crispy sesame seed crust on the outside:
Let's wrap people!
ALL mine!
Seared Ahi Tuna Rolls
Yields: about 8 - 10 rolls
Original wasabi-soy sauce can be found here.

For the rolls:
Ahi tuna steak, about 6 oz.
1 - 2 tbsn. olive oil
Salt, to taste
Black & white sesame seeds (enough to coat)
Rice paper
1 green mango, de-seeded and sliced
1 avocado, de-seeded and sliced
1 cucumber, sliced
1 bunch of mint

For the spicy mayo:
1/2 cup mayonaise
1/8 cup Siracha/ hot chili sauce
3 tsp. lemon/ lime juice
1 tsp. sesame oil
1 tsp. soy sauce
Wasabi (I used a pea sized amount)

For the wasabi-soy dressing:
1 lime, juiced and zested
1 tbsn. rice vinegar
2 tsp. soy sauce
2 tbsn. sesame oil
1 tbsn. sugar
1 tsp. fresh minced ginger
1 tsp. fresh minced garlic
1 tsp. coarse black pepper
1 tsp. wasabi or wasabi powder

In a shallow dish, combine equal parts of white and black sesame seeds, enough to coat both sides of the fish (about 1 tbsn. each). Pat dry the tuna then lightly season with salt. Coat each sides of the fish in the sesame seeds, set aside. In a large saucepan, add the olive oil and heat over medium-high heat until hot. Once hot, add the tuna and sear both sides of the tuna, about 1 - 2 minutes each side. Remove from the pan and let rest until cool. Once cool, slice into 1/2 cm inch pieces. Take a piece of rice paper and wet under warm water and place on a clean surface. Once moist, add some romaine lettuce, mint leaves, 1 - 2 pieces of seared tuna, 1 - 2 slices of avocado, 1 - 2 pieces of green mango and 1 - 2 pieces of cucumber. Check video below for tips on how to roll a spring roll.

To make the spicy mayo, combine everything until smooth, adding more or less of anything to suit your taste. To make the soy dressing, mix everything until well combined, adding more or less of anything to suit your taste. Serve the spring roll with both sauces, side by side or mixed together. Enjoy!

Crunchy green mango, crisp lettuce, velvety smooth tuna and chewy rice paper, what more could you want?
I love spring rolls.

Tuesday, November 10, 2009

Tailored Tuesdays

1. James Perse "Casual cotton t-shirt"
2. Erdem "Dulcie satin organza skirt"
3. Ray Ban "Wayfarer acetate sunglasses"
4. Marc Jacobs "Kate leather shoulder bag"
5. Alaia "Patent t-bar flat sandals"
6. Dannijo "Goldtone floral ring"

all images can be found at net-a-porter.com