Showing posts with label Healthy. Show all posts

Thursday, September 6, 2012

Kale Caesar Salad


I love dark greens, such as chard, collard or what have you may, but my most favorite is kale. It's not too bitter and is amazing cooked or raw. My favorite thing to do with it is simply make kale chips by tossing them in some s&p, then roasting it in the oven for a bit. Fixes my craving for something salty and crunchy while being healthy too! If that isn't a win, I don't know what is...


Another thing I love is a good caesar salad. If you've got a great recipe for caesar dressing, it's something to tuck into your recipe book to pass along to your kids and cherish forever. I'm pretty serious about a good caesar dressing. Anyways, kale smothered in a good caesar dressing plus some crispy croutons makes a great meal.


Wouldn't you agree?!


Kale Caesar Salad
Yields: 2 full servings, or 4 small servings
Original dressing recipe here.

For the croutons:
6 1" slices of crusty white bread, cut into cubes
2 tbsn. olive oil
1 tsp. minced garlic
1 tbsn. fresh flat leaf parsley, minced
salt and pepper, to taste


For the dressing:
2 anchovy filets, or to taste
2 garlic cloves, or to taste
1 cup mayonnaise
1/4 cup half-and-half cream or milk
1/3 cup grated Parmesan cheese
2 tbsn. fresh-squeezed lemon juice
1 tbsn. Dijon mustard
salt and pepper, to taste
2 tsp. Worcestershire sauce, or to taste (optional)
buttermilk or half-and-half, for thinning

2 bunches of kale, washed and dried thoroughly, torn into bite-sized pieces
shaved Parmesan cheese, to taste


To make the dressing, in a small food processor or blender, mince the anchovy filets and garlic together until finely minced. Add in the remaining ingredients and process for 30 seconds or more until well combined. Adjust the seasonings to taste and thin with buttermilk or half-and-half for a thinner consistency, if desired. To make the croutons, preheat the oven to 350 F. In a medium-sized bowl, toss the bread cubes with the remaining crouton ingredients. On a large parchment paper lined baking sheet, toast the croutons until golden brown, about 10 - 15 minutes. To assemble the salad, add the kale leaves into a large bowl. Add croutons and parmesan cheese according to how much you like in your salad. Add enough dressing to coat, then divide among plates. There will be a lot of dressing left over!

Tuesday, May 22, 2012

My Favorite Meal (As of recently...)


Once I get hooked onto something... I really get hooked. See this meal. I swear I was eating that meal for months! Since I usually cook for myself, I usually have to end up eating leftovers until it's all gone, but for this combo, I find myself cooking it over and over again and never getting bored of it.

Really, it's the simplest components that could be enjoyed separately, but I just love them together. First, it starts off with a simple but incredibly tasty rice pilaf. I make it all of the time and the fact that I can just put all of the ingredients into a rice cooker and walk away is magic; pure magic. Next, comes the fattoush salad dressed in a simple greek dressing. It's all of my favorite veggies in a dressing that keeps everything fresh and light. If I want, I sauté some spinach with some olive oil and garlic, set it all on a plate and sprinkle with some French feta. And yes, French feta is completely different than Greek feta, and much more tasty - in my opinion!

The picture above is how I normally enjoy all of this stuff but honestly, these are simple recipes for you to use with your own discretion. The rice pilaf is excellent under kabobs and the fattoush is awesome on top some lettuce! Let me know how you like to use these recipes :)


Simple Fattoush Salad
Yields: 4  servings

For the salad:
3 roma tomatoes, seeded and cubed
1 medium cucumber, peeled, seeded, and cubed
1/4 red onion, thinly sliced
3 green onions, sliced
3 tbsn. chopped fresh mint

For the dressing*:
1/4 cup lemon juice
1/4 cup extra virgin olive oil
2 tsp. seasoned salt (such as Lawry's)
2 tsp. salt
1 tsp. lemon pepper
1 tsp. black pepper
1/2 tsp. granulated garlic
1 tsp. dried mint

To make the dressing, combine all of the ingredients in a small jar. Seal the jar, then shake vigorously until combined and slightly emulsified, set aside. Toss all of the salad ingredients together in a large bowl. *The dressing makes much more than needed for the fatuous, but is excellent on almost everything, so save for future use. Use just enough dressing to coat the veggies. Set aside to marinade in the refrigerator for at least 30 minutes. 


Sometimes I like to enjoy the fattoush as a mid-day snack - I love it so!


Classic Rice Pilaf
Yields: 6 - 8 servings

1/2 cup fideo noodles
3 tbsn. unsalted butter, melted
1 cup jasmine rice
1 tsp. salt
1/2 tsp. freshly ground pepper
2 cups water*

Preheat the oven to 350 F. Spread the fideo noodles out on a baking sheet and toast until golden brown, about 5 minutes. Make sure to check after 3 minutes just in case your oven is super hot; set aside. In a rice cooker, combine the rice, toasted fideo noodles, butter, spices and water. Cook under the 'white rice' setting. After done, fluff with a fork and enjoy!

*You could use low-sodium chicken stock as an alternative!

Tuesday, March 6, 2012

Cheesy Quinoa Bowl


This is one of the easiest meals ever! And so uberly delicious. I am totally enamored with roasting veggies right now... because, well, almost anything tastes good when it's roasted. I guess the same concept that applies to frying food applies to roasting food, because it's worked for me! Seriously, any veggie roasted equals happy stomach for me, plus, I don't get why brussels sprouts get such a bad rap? They're so friggin' delicious, and they're so cute - like mini cabbages, which, basically they are!

Anyways, the quinoa is just a great base to any meal you'd want to cook. It's incredibly simple. All you do is cook the quinoa in your rice cooker, and it does all the work for you! No simmering over a pesky stove or stirring and all that jazz. After it's all cooked, just quickly sauté it up with some garlic and Parmesan and by gosh, it's so tasty. 


I top it with whatever I have at the moment, like above, I had some roasted brussels sprouts, I wilted down some spinach, and topped it with feta and pine nuts and it was so satisfying and so healthy! One of my favorite quick meals, honestly. But the possibilities are endless. As a side to some grilled salmon, or the base of a salad - use your imagination :)


Cheesy Quinoa Bowl
Yields: about 6 servings


For the quinoa:
2 cups cooked quinoa (I used 1/2 regular and 1/2 red quinoa)
1/4 cup Parmesan cheese
1/4 cup crumbled French feta cheese
1/4 cup pine nuts, toasted
3 cloves garlic, minced
3 tbsn. olive oil
salt and freshly ground pepper, to taste


Optional toppings:
roasted veggies of any kind
sautéed spinach with garlic
poached egg
seared salmon
... the options are endless


In a large skillet, heat the olive oil over medium heat. Add the garlic and sauté until fragrant, about 1 minute. Add the quinoa and heat until warmed and the garlic flavor is fragrant throughout. Once warmed through, add the Parmesan and heat until it starts to melt, about 1 - 2 minutes. Remove from the heat, then stir in the feta cheese and pine nuts. Season to taste with salt and freshly ground black pepper. Serve under anything you'd like!


Thursday, December 8, 2011

Quinoa-Farro Salad with Grilled Lemon Chicken


This quinoa salad has been my lifeline for the past month... and this just in: I'm still not sick of it!

It's love.


Inspired by a salad from a restaurant, I was determined to make it myself at home. Simply determined. So the next day I went to my local market to get my hands on some farro, which I must say is quite expensive compared to other grains! But on the upside, it's delicious and has this amazing toothy quality that adds to the quinoa's soft almost rice-like texture. If you want to keep it low budget - I suggest trying barley instead (I plan on trying it myself soon).

Anyways, with all the fresh herbs and veggies, it's simply perfect. I had never tried farro before and was stunned at how much I loved it. The combination might not sound so appetizing to non-health freaks but I swear, everyone who has tried has loved it! The lemon-y dressing and French feta make it so irresistible  and all of the textures keeps your taste buds guessing at each bite. This salad is equally amazing with some grilled shrimp on top!


Quinoa-Farro Salad with Grilled Lemon Chicken
Yields: 10 servings


For the chicken:
10 chicken tenders
1/4 cup olive oil
1 lemon, zested and juiced
6 cloves garlic, minced
1 tsp. freshly ground black pepper
1 1/2 tsp. kosher salt


For the salad:
1 cup quinoa
1 cup farro
2 large red bell peppers, seeds removed, sliced, cut into 1" pieces
5 Persian cucumbers, seeds removed, sliced into 1 cm pieces
1 small red onion, thinly sliced
1 cup cherry tomatoes, halved
1 cup golden raisins, rehydrated in warm water
1 cup French feta cheese, crumbled
1/4 cup fresh mint, chopped


For the dressing:

1/3 cup lemon juice
1/2 cup olive oil
1 1/2 tsp. salt
1 tsp. crushed dried mint
1 tsp. ground black pepper
1 tsp. seasoned salt


To make the dressing, whisk together everything in a small bowl to blend and set aside in the refrigerator until needed. For the chicken, add the olive oil, lemon juice, lemon zest, garlic, salt and pepper into a large bowl. Mix together and add the chicken. Stir well to coat, then cover the bowl in plastic wrap. Allow the chicken to marinate for at least 2 hours and up to overnight. Before grilling, allow the chicken to come to room temperature. Grill over a medium-high flame until cooked through, about 5 minutes on each side.


To cook the quinoa, add the quinoa and 1 1/4 cups of water into a rice cooker. Cook using the 'white rice' setting. Once done, remove the quinoa and allow to cool to room temperature. While the quinoa is cooking, heat a large sauce pot over high heat. Add the farro and 2 1/2 cups of water. Bring the mixture to a boil, then reduce the heat to medium-low to a simmer. Cook for 20 - 30 minutes until tender. If there is excess water remaining, drain the farro and set aside to cool.


In a large mixing bowl, combine the cooled grains, all of the vegetables and drained, re-hydrated raisins. Mix to combine. If not serving immediately at this point, you can refrigerate this mixture until ready to eat, it usually keeps in my refrigerator for up to a week. When ready to serve, toss in the feta cheese and enough dressing to lightly coat. Eat cold or at room temperature and serve with the warm chicken.

Friday, September 16, 2011

Pureed Mushroom Soup


I have reached mushroom nirvana!


This soup is pure, unadulterated mushroom goodness and goodness is the perfect word to describe this soup. Since it's pureed, it's creamy as hell, yet, if you can believe it, has no cream, milk and only 2 tbsn. of olive oil! The addition of 1 single potato makes it thick and luxurious and it really is magical. If you love mushrooms, this soup is for you. It's pure mushroom flavor and super easy to make.


Pureed Mushroom Soup
Yields: 4 - 6 servings
Adapted from here.

2 tbsn. olive oil
1 onion, coarsely chopped
3 cloves garlic, coarsely chopped
coarse salt and freshly ground pepper, to taste
20 oz. button mushrooms, trimmed and quartered
1 baking potato, peeled and cut into 1" chunks
2 sprigs thyme, leaves taken off the stem
2 14.5 oz. cans of reduced sodium chicken stock

In a large pot, heat the oil over medium heat. Add the onion and garlic and season with salt. Cook, stirring occasionally, until softened, about 5 - 7 minutes. Add the mushrooms, potato, thyme, broth and enough water to cover, about 2 - 3 cups. Bring to a boil, reduce the heat to medium and simmer until the mushrooms and potatoes are tender, about 20 - 30 minutes. Using a blender or an immersion blender, puree the broth and veggies until smooth. If using a blender, work in batches and fill only halfway, allowing the heat to escape. Transfer to a clean pot as you work. Adjust the soup's consistency with a little water if needed, and season to taste with salt, pepper and lemon juice.


Thursday, July 21, 2011

10 Grain Milk Bread


I'm very lucky to work at a bakery. Lucky in the way that I get to eat tons and tons of award-winning baked goods. Mmmm. Possibly unlucky in the fact that I should not be eating these award-winning baked goods on a weekly basis...

But, that aside, one of my favorite things to nom on is their 7-grain bread. It's amazingly soft yet has so much texture from all of those hearty grains. This recipe isn't theirs, apparently their recipe is top secret pshhh! This recipe is something I kind of developed from my favorite, favorite milk bread recipe. The Tangzhong method keeps it soft for days as it always seems to magically do and then 10 grains make it hearty and perfect for sandwiches. Speaking of... delicious sandwich made from this 10 grain bread to be posted very soon!


10 Grain Milk Bread
Yields: 1 9x5" loaf
Original recipe here.

1 1/4 cups whole wheat flour
1 cup bread flour
1/2 cup 10 grain cereal mix, plus more for topping
3 tbsn. sugar
1/2 tsp. salt
2 tsp. instant yeast
1 large egg
1/2 cup buttermilk (regular milk or soy milk also works)
120 g. tangzhong (about 1/2 of the mixture below)
3 tbsn. butter, cut into small pieces, at room temperature

For the tangzhong:
1/3 cup bread flour
1 cup water

To make the tangzhong, mix the flour and water together and whisk until it is completely dissolved and there are no lumps. Pour into a small saucepan and heat over medium heat. Begin stirring constantly as the mixture heats up - it will begin to thicken. When the temperature of the mixture reaches 150 F, turn off the stove and remove it from the stove to let it cool. 

In the bowl of a stand up mixer, combine the flours, cereal mix, salt, sugar and yeast and mix. In a large liquid measuring cup, combine the milk, egg and tangzhong and mix very well. Form a well in the center of the dry ingredients, then pour the wet ingredients into the center. Fit the mixer with the hook attachment and begin mixing on medium speed until the dough comes together, then add the butter in and continue kneading. Knead until the dough is smooth, not too sticky on the surface and elastic, about 18 - 20 minutes (but each mixer varies). When ready, you should be able to take a chunk of the dough and stretch it to a very thin membrane before if breaks. When it does break it should form a circle. Remove the dough from the mixer and knead into a ball. Take a large bowl, grease it with oil, then place the dough into the bowl and cover with a wet towel. Let it proof in a warm place until it's doubled in size, about 40 minutes. 

Once the dough has doubled in size, transfer it to a clean surface. Roll out the ball with a rolling pin into an oval shape. Take one end of the dough and fold it to meet the middle of the oval, then take the other end and fold it to meet the middle. Flip the dough over with the folds facing down and flatten with a rolling pin. Roll out the dough until it forms a thin rectangle. Begin rolling up the dough along the wide/ long side of the rectangle so you end up with a long skinny roll rather than a short and fat one. Place it into a 9x5" bread pan lined with parchment paper. Cover in plastic wrap and let rise until doubled in size, about another 40 minutes. Beat an egg and brush the mixture on top before baking. Bake at 325 F for 30 minutes or until golden brown.


Thursday, May 26, 2011

Roasted Garlic Hummus

If I were to have a relationship with any food on the planet, it would be garlic. It is my one and true love, and I've known it to be ever since I could remember. I've always loved it - love at first taste if you will. When I was younger (say adolescent, mid-teenish), I used to just simply fry up smashed garlic in some salt and pepper and eat it. Alone. I know, I'm weird, but that's how much I love the stuff.
When a recipe calls for 1 clove of garlic, I scoff, and triple (possibly quadruple) the amount. I've been working my way along making mezze appetizers (see here), since I can't get enough of the stuff and what better than to combine two of my obsessions: garlic and mezze. Together, their love child is the simply irresistible roasted garlic hummus.
I have a hummus recipe I adore that's simple, easy to whip up and delicious. I just tweeked it a bit by adding loads of roasted garlic and I was in heaven. With warm pita bread or in a sandwich, it is purely awesome! Plus, it's healthy and lasts for weeks!
Roasted Garlic Hummus
Yields: approximately 2 1/2 cups
adapted from Zov's Recipes and Memories from the Heart 


2 heads garlic + 2 garlic cloves
2 cups of canned garbanzo beans, drained
1/2 cup of fresh lemon juice
1/2 cup of tahini paste
1 1/2 tsp. salt
1 tsp. ground cumin
1/2 cup olive oil + extra for drizzling over garlic heads

Preheat the oven to 400 F. To roast the garlic, peel off the outer layer of the garlic bulb, leaving the skins of the individual cloves intact. Using a sharp knife, cut off 1/4" of the tops of the garlic bulbs, exposing the individual cloves inside. Place the heads in a large piece of foil, then drizzle with about 1 tbsn. of olive oil. Fold and roast for 30 - 45 minutes or until the cloves are soft. Allow the garlic to cool until you can handle it. Once cool, use either a fork to fish out the garlic cloves or you can squeeze them out of their skins; set aside. Mince the fresh garlic in a food processor. Add the garbanzo beans, lemon juice and roasted garlic, blend until creamy, scraping the sides of the bowl occasionally. Blend in the tahini, cumin, and salt. With the machine running, stream in the olive oil and blend until creamy and combined. Add in the jalapenos and cilantro, blend until well minced and combined. Serve and enjoy!

Friday, May 6, 2011

Baked Zucchini Fries with Marinara


The Mexican market around the corner from my house, which I previously mentioned in my last post, always has great prices on produce. Sometimes though, I get tricked by the great prices and overlook the not-so-awesome quality of the product. I bought a bunch of strawberries that weren't all that hot, so I made some delicious strawberry-lychee aguas frescas instead. Problem solved. 
Another great price flashed before me and then I found myself buying a huge bag full of zucchini. I love zucchini and I practically got a whole bag full for free - that's how awesomely cheap it was. This time though, the prices weren't a cover for the quality. Awesome, awesome zucchini - now what to do with it?


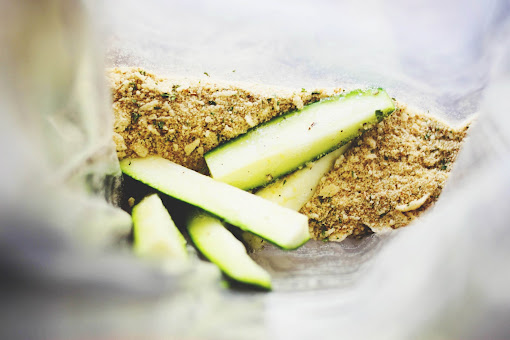
Zucchini fries! I had everything on hand and I felt like a snack. After trimming, slicing, dredging, and tossing into a hot oven to crisp up I was rewarded with a healthy, nom-worthy snack within all but 15 minutes. It was awesome. Normally, telling you that I ate the whole batch within one sitting would make me a bit shameful, but heck... I'll admit eating 3 zucchini within a sitting any day. I'm sure I made mothers and nutritionists proud everywhere around the world!

Baked Zucchini Fries with Marinara
Yields: 3 servings
Original recipe here.

For the zucchini:
3 medium zucchini, sliced into sticks
1 large egg white
1/3 cup seasoned whole wheat bread crumbs
2 tbsn. grated Pecorino Romano cheese
cooking spray
1/4 tsp. garlic powder
salt
fresh pepper

For the marinara sauce:
1 tsp. olive oil
2 garlic cloves, smashed
28 oz. cans crushed tomatoes
1 small bay leaf
1 tsp. oregano
2 tbsn. chopped fresh basil
salt and fresh pepper, to taste

Preheat the oven to 425 F. In a medium pot, heat the olive oil over medium heat. Add the garlic and saute until golden, being careful not to burn it. Add the crushed tomatoes, salt, pepper, oregano, basil and bay leaf. Stir and reduce the heat to low. Cover and let simmer about 20 minutes. In a small bowl, beat the egg whites and season with salt and pepper. In a ziplock bag, place the breadcrumbs, garlic powder and cheese; shake well. Spray a cookie sheet with cooking spray and set aside. Dip the zucchini sticks into the egg and then place into the bread crumb and cheese mixture, a few at a time and shake to coat. Place the breaded zucchini in a single layer and spray more cooking spray on top. Bake for 20 - 25 minutes, or until golden brown. Serve with some marinara sauce for dipping. 


Thursday, May 5, 2011

Stuffed Peppers


I'm a baker. I'm sure you know that by the looks of my blog here, but it's something I've ascribed to myself for some time now. Over the years, I've mastered my fears and perfected everything from cupcakes, to cookies to even bread. I've never been a cook. If I was a cook, it was merely just me trying on the title of 'cook' for the moment - following step by step directions for a recipe. 


As a baker, you rely on science, exact measurements. Cooks experiment, they rely on their instincts. I've never been one good with instincts. It's always a constant battle of heart versus head for me. Past internal conversations usually involved my heart longing for thisthat and this while my head disagreed and said thisthat and this are not possible, will not work, will fail. Recently though, it's been gratifying just to play around and end up with something good once in a while. Sometimes things don't work out, and that's okay. 

It's times when things do work out, and work out splendidly I might add, that make you want to try and try again. These stuffed peppers are an actualization to this fact. I didn't follow a recipe, I improvised, I let my heart guide me:

Heart: I want some mushrooms in my stuffed pepper.
Head: Mushrooms are too watery for the filling!
Heart: To hell with you head! Mushrooms it is!

Mushrooms won and I won in the end. These stuffed peppers are delicious, healthy, and an incredibly satisfying meal if not, an incredibly satisfying life lesson :)


Stuffed Peppers
Yields: 6 - 7 stuffed peppers

6 - 7 bell peppers (I used green because they had a nice shape for stuffing)
1 tbsn. olive oil
1 small red onion, chopped
1 cup mushrooms, sliced
3 garlic cloves, minced, divided
1 lb. lean ground beef (I used 80% lean)
1 cup cooked brown rice
1/2 tbsn. dried parsley or 1 tbsn. fresh
1 tsp. salt, divided
1 tsp. freshly ground black pepper, divided
1 tbsn. Worcestershire sauce
1 large egg
1/4 cup grated Parmesan cheese
1 8 oz. can tomato sauce
1/4 cup water

Preheat the oven to 350 F. Cut the tops off of the peppers and remove the seeds and ribs. Save the tops and dice them; set aside. If your peppers do not stand well on their own, you can slice off a small sliver on their bottoms to even the base - but be sure not to cut through to the inside. In a large pan, heat the olive oil over medium heat. Add the onions and 2/3 of the garlic and cook for 2 - 4 minutes, or until semi-translucent. Add the ground beef and use a wooden spoon to break up the meat. Season with 1/2 tsp. salt, 1/2 tsp. pepper and the Worcestershire sauce. Cook until the meat is no longer pink, about 5 - 7 minutes. Drain this mixture using a fine sieve and then place into a large bowl. 

In the same saucepan, add the chopped bell peppers that you had set aside earlier, along with the mushrooms. Dry saute this over high heat to give some 'sear' to them and so that they just lose their 'crispness.' Once done, throw on top of the ground beef mixture, then add the cooked rice on top. In a small bowl, combine the egg, parsley, Parmesan and remaining salt and pepper; mix to combine, then pour into your bowl. Mix everything to combine, then stuff as much of this mixture as you can into your peppers. Place the peppers into a baking dish. Mix the water and tomato sauce together, then pour around the peppers. Bake for 45 minutes and enjoy!


As a side dish to these, I decided to throw some brown rice and corn together. Seasoned it simply with some salt and pepper and it was splendid.